Email Addresses: POP3
The NewSprout web hosting packages give you the ability to setup your own Email Addresses on your domain name. This can be done through our cPanel interface giving you full control to add, edit or remove your own email accounts and passwords. A quick video tutorial is included once logged into cPanel to set you on the right track.
If you are out and about and don’t have access to your usual email client/program (such as Outlook, Thunderbird or Mac Mail) you can gain access to each POP3 or IMAP Email account created on your domain using a choice of RoundCube, SquirrelMail or Horde. This can be accessed from any computer with an internet connection anywhere in the world!
========
Webmail:
To access it, go to www.yourdomain.com.au/webmail
This is also a great place to test if you are using the correct password when setting up your mail on your computer.
If you can’t login here, then please login to your cPanel and under “Email Accounts” go the “Change Password” option next to the relevant email address.
========
========
Basic Settings (you’ll need these regardless of which email program you choose):
Type: POP or IMAP (if in doubt please use POP, as this will download all email to your computer and clear out your mailbox to avoid it reaching capacity)
Email Address: the email address you are setting up (the one you have just created in your cPanel or your free ADSL email address we sent you)
Username: same as the “Email Address” (Please Note: it is the FULL address and not just the first part)
Password: the one corresponding to this email address (the one you have just created in your cPanel or the one we sent you for your ADSL account)
Incoming Server: mail.yourdomain.com.au (please replace “yourdomain” with your actual domain name, i.e. the last part of your email address)
Outgoing Server: mail.yourdomain.com.au (please replace “yourdomain” with your actual domain name, i.e. the last part of your email address)
For the Outgoing SMTP Server there are 2 extra steps and you may need to go back into the account settings to change these once your email account is setup (usually found under Advanced Settings in your email program):
1. Enable Password Authentication
2. Find the SMTP Port that says “25” and change it to “250”
Also, try unticking the “Use SSL” options.
========
For specific settings for your email program, scroll down to the one you use, if it is not listed, please let us know and we’ll add it:
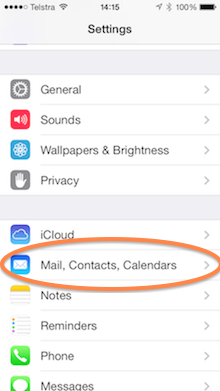
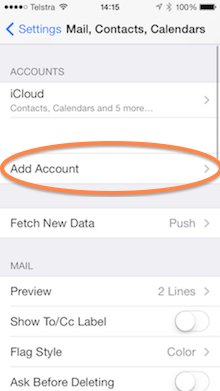
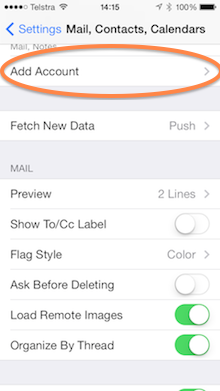
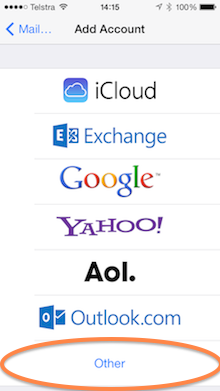
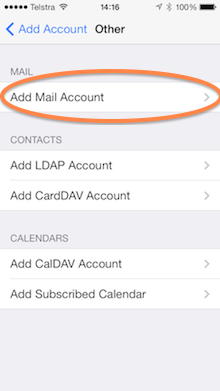
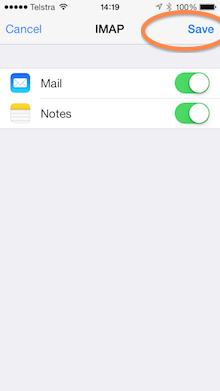
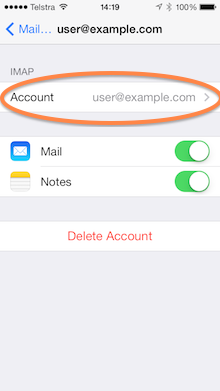
For help adding an iPhone or iPad Mail account (iOS):
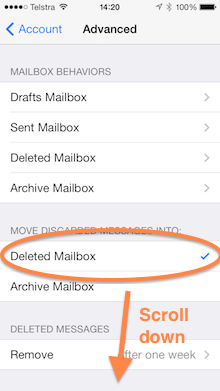
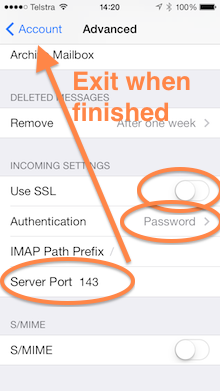
Go to Settings and follow these 21 steps, please replace the “example.com” domain name with your real domain name:
(please also see notes at the end)

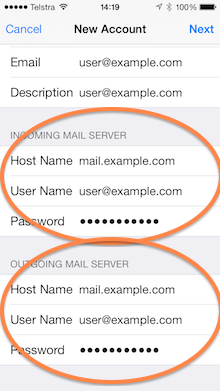


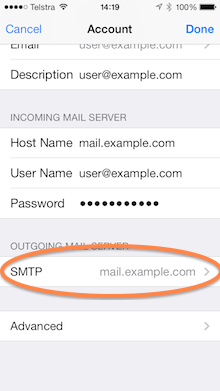
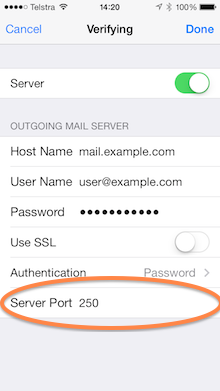
A few little things to note:
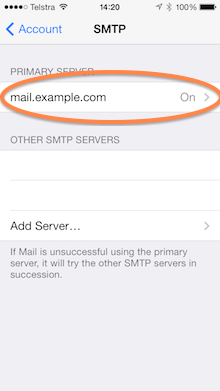
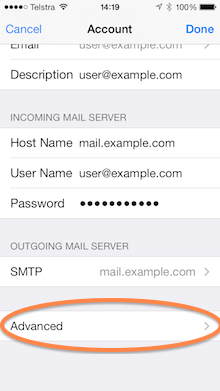
- Outgoing Server: this should be the same as your Incoming Server with Port changed to: 250
- Ticking the “Deleted Mailbox” shown above rather than the “other” one will allow you to delete emails on your iPhone.
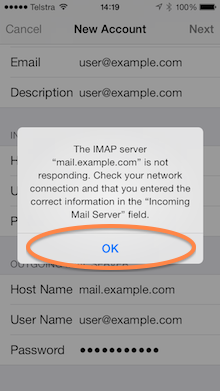
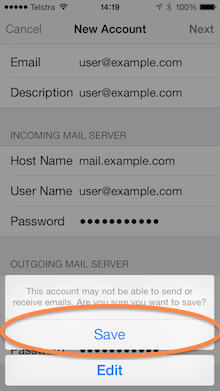
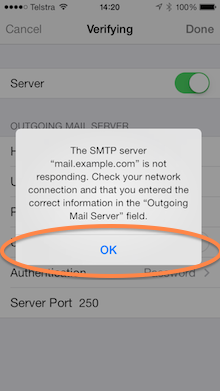
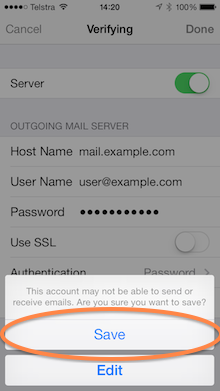
- Some of the screens take a while to complete. Please ensure you wait for them to complete properly and follow all steps above.
For help adding a Mac Mail account:
- Open Mail
- Click File > Add Account
- Account Type menu: POP3
- Account Description field: your full email address (i.e. the one you created in cPanel)
- Enter your name as you would like it to appear on email messages in the Full Name field
- E-mail Address box: your full email address
- Click Continue
- Incoming Mail Server: mail.yourdomain.com.au.
- User Name field: your full email address
- Enter your password for that specific email account in the Password field
- Click Continue
- Outgoing Server: this should be your internet provider’s outgoing server, e.g. mail.optusnet.com.au if Optus is your provider, or mail.bigpond.com if Bigpond is your provider. Your internet provider will be able to tell you this.
- Click Continue
Please also check the following if it is not working:
- Add additional SMTP servers in Mac Mail:
- From the Mail menu, choose Preferences
- Choose Accounts
- Select your account in the list on the left
- Click the drop-down list to the right of Outgoing Mail Server (SMTP): choose Add Server… and put the information into the window that appears, mail.yourdomain.com.au (i.e. the same as your incoming server), for the SMTP hostname.
- You can also then change the port from 25 to 250 for the NewSprout Outgoing Server (which is mail.yourdomain.com.au). This is an alternate port we have setup – follow these steps:
- From the Mail menu, choose Preferences
- Choose Accounts
- Select your account in the list on the left
- Click the Server Settings button towards the lower right side of the window
- In the Server Port field of the new window, delete the number 25 and replace it with the number 250
For Outlook users, have a look at these settings if you need help setting up your email address:
- Open Outlook (if it starts a wizard, that is great, just follow the steps with some help below)
- If no wizard starts, then go to Tools > Email Accounts (or Account Settings) > Add (or New) or Change account and go to the Properties page for that account
- If an “Auto Account Setup” page displays, please don’t enter any details, just go to the bottom of the page and tick the option to “Manually configure server settings or additional server types” and click “Next”
- Choose POP Account (choose Manually Configure if Outlook gives you this option)
- Enter your name as you would like it to appear on email messages in the Your Name field
- Incoming Server field: mail.yourdomainname.com.au
- Outgoing Server field: this should be your internet provider’s outgoing server, e.g. mail.optusnet.com.au if Optus is your provider, or mail.bigpond.com if Bigpond is your provider. Your internet provider will be able to tell you this.
- Username: your full email address (i.e. the one you created in cPanel)
- Password: your password for that address and please make sure the “Remember password” option is ticked.
- You can then click on “Test Account Settings” to see if you get all green ticks, or if not, the red crosses will tell you where the problem is. If you still experience problems please let us know and we will help you by talking you through it)
Please also check the following if it is not working:
- Please also make sure “Require logon using SPA” is unchecked
- And, under “More Settings” > “Outgoing Server” tab > “My Outgoing server requires authentication” is also unchecked
- However, if you are using the NewSprout Outgoing Server, which means your Incoming and Outgoing Servers are the same (i.e. mail.yourdomainname.com.au), the “My Outgoing server requires authentication” option should be ticked with “Use same settings as my incoming mail server” also ticked
- You can also then change the port from 25 to 250 for the NewSprout Outgoing Server (mail.yourdomain.com.au). This is an alternate port we have setup – follow these steps:
- Under “More Settings” > “Advanced” tab
- change the Outgoing Server (SMTP) port from 25 to 250
If you use Outlook Express or Windows Mail:
- In Outlook Express or Windows Mail, on the Tools menu, click Accounts (if the Internet Connection Wizard starts up automatically, skip ahead)
- Click Add, and then click on the Select Account Type page click E-mail Account and Next (or to Edit an existing account, click once on the account listed and click Properties)
- Fill in the Display Name with the name you want to appear to everyone who gets E-mail from you, and then click Next again
- On the Internet E-mail Address page, type your E-mail address, and then click Next
- On the E-mail Server Names page
- Select POP3 as your incoming mail server
- Incoming Server field: mail.yourdomainname.com.au
- Outgoing Server field: this should be your internet provider’s outgoing server, e.g. mail.optusnet.com.au if Optus is your provider, or mail.bigpond.com if Bigpond is your provider. Your internet provider will be able to tell you this
- Leave Outgoing server requires authentication unticked and click Next.
- Then, on the Internet Mail Logon page
- Username: your full email address (i.e. the one you created in cPanel)
- Password: your password for that address and please make sure the “Remember password” option is ticked.
- Click Next, and then click Finish.
- If you’re not using your internet provider’s outgoing server (possibly if you have a laptop), your’re not finished quite yet :-) For laptop users, make these changes if you want your Outgoing Server to be the same as your Incoming Server:
- You should be back on the Internet Accounts window, if not, go to the Tools menu and click Accounts again
- Once there, click ‘once’ on the account listed and click Properties
- Click on the Servers tab
- Copy and paste your Incoming mail (POP3) details into the Outgoing mail (SMTP) box
- Please also make sure “Require logon using SPA” is unchecked
- And tick “My server requires authentication” and click Apply
- Then, under the “Advanced” tab change the Outgoing mail (SMTP) port from 25 to 250 and click Apply again
- Click OK
- That’s it!
Thunderbird:
- In Mozilla Thunderbird, on the Tools menu, click Account Settings
- Click Email Account, and then click Next
- Fill in Your Name with the name you want to appear to everyone who gets E-mail from you, and your Email Address then click Next again
- Select POP as the type of incoming server you are using and fill in the Incoming Server field as: mail.yourdomainname.com.au
- Click Next
- Fill in both Incoming User Name and Outgoing User Name with your full email address and click Next
- Fill in the Account Name with your full email address too and click Next
- Click Finish
- Please Note: Thunderbird doesn’t ask for a Password during the setup. To change your password saved by the password manager, you can delete it. Then when Thunderbird needs it again it will prompt you for the new password, you can then enter the new one and select “Use Password Manager to remember this password” option
- To delete the existing password go to Tools > Options > Privacy > Passwords > View Saved Passwords. Select the password and then click Remove
- Outgoing Server Settings:
- Go back to the Tools menu, click Account Settings
- Select Outgoing Server
- Change the Server Name to your internet provider’s outgoing server, e.g. mail.optusnet.com.au if Optus is your provider, or mail.bigpond.com if Bigpond is your provider. Your internet provider will be able to tell you this
- Untick Use name and password
- Select No for Use secure connection
- If you’re changing internet connections quite often (possibly if you have a laptop and you travel), then Thunderbird has a great feature to add extra outgoing servers:
- Select Outgoing Server
- Select Advanced and Add
- Add the Server Name as the same as your incoming server name and change the Port to 250 (only use this if your outgoing server is set to the same as your incoming server, otherwise use Port 25, see note below)
- Tick Use name and password and make sure your User Name is entered as your full email address
- Select No for Use secure connection
- You can then switch between SMTP servers
PLEASE NOTE:
You may not be able to send email if your Internet Service Provider (ISP) doesn’t allow access through certain ports. For email that does not use the ISPs own outgoing (SMTP) servers, some ISPs may block access to Port 25. Port 25 is the standard port used to send mail. The reason they do this is to discourage the sending of SPAM or unsolicited bulk email (UBE). However, it can also make it difficult to send email using an authentic SMTP server other than the one provided by your ISP.
The solution:
You can either use your ISPs Outgoing Server (recommended), or for laptop users that are constantly connecting to different internet providers, it can be easier to use NewSprout’s outgoing server. You can then change the port from 25 to 250 for our Outgoing Server (it is an alternate port we have setup), and also enable “authentication”. Please follow the instuctions above.